Brewing in a bag is one of the best ways a new brewer can get into all grain. You don’t need a bunch of equipment; it doesn’t take up a lot of space and it’s as easy as making a giant batch of tea.
If you’ve ever wanted to jump in all grain brewing but never knew where to start or if you’re looking to simplify your brewing day then try Brew in a bag (BIAB).
BIAB – Brew in a bag.
Brewing in a bag or biab, is a perfect starting point for new brewers who are looking to make the jump to all grain but don’t want to spend a ton of money on a three-vessel system. It’s also much less intimidating for new brewers since the process is one of the simplest of all the brewing systems.
If you already have a large stockpot, you might only need one thing to get started.
I’ll get into gear in a little bit but first let’s talk about how brewing a bag came about. BIAB brewing a bag’s history is a bit cloudy and no one can quite pinpoint its invention, but it really came into popularity thanks to some genius folks in Australia who are looking to simplify the home brewing process. When I started brewing, I always felt intimidated by the three-vessel system and also living in an apartment I never felt that all-grain brewing was doable for me. That’s until I began reading blogs and books about brewing in a bag. The main idea about biab is that instead of three vessels that hold the liquid, you do it all in one kettle.
You use a mesh bag to hold crushed grain and then steep them in hot water to extract the sugars, creating the wart. If you’ve ever made a partial extract kit then you’ve done a smaller form of biab, in fact most of the time you’re given a small muslin bag to add your specialty grains.
The difference is that instead of using extract to make the base of your work, you’re going to create the full work from using all crushed grains that you steep in a much larger bag. The beauty of brew in the bag is that it’s all done in one vessel or kettle, that means that at the end of the brew day you only have one pot to clean up. It’s one of the major reasons I stuck with it for so long. Plus, I’m making amazing beer using brew in a bag and I don’t see any reason to change it up.
Now let’s talk Equipment.
At the very core of brewing a bag, you only need two things to get started; the kettle and the brew bag. The size of the kettle will determine how big of a batch of beer you’re looking to make. In general, you need to add a little bit more than your desired final volume to account for losses. Those losses include grain absorption rate and boil off rate.
Grain absorption is the amount of liquid the crushed grains will soak up when you add them to your kettle. Most brewing software have an estimate for this but generally we’re talking about .12 quarts per pound of grain. This can vary based on many things but, for a five-and-a-half-gallon batch it can be up to one gallon. Boil off rate is dependent on how vigorous and how long you boil for. The only way to know this is to test out a boil with water in your kettle and set a timer for 30 minutes to see how much is boiled off then make note for future batches.
Let’s say for this example, we boil off half a gallon in half an hour, so if we want five and a half gallons in our fermenter, we’re going to need at least a seven-gallon kettle. But I would recommend an eight-gallon kettle to be safe, as boil overs are no fun to clean up.
If you do smaller batches just do the same calculations to determine the right kettle size for you. Brew in a bag can be done for any size homebrew batch. The last thing I’ll say about kettles is that it can be helpful to have a valve near the bottom of your kettle to dump out the water into your fermenter – not required but it’s easier than lifting up five gallons of liquid.
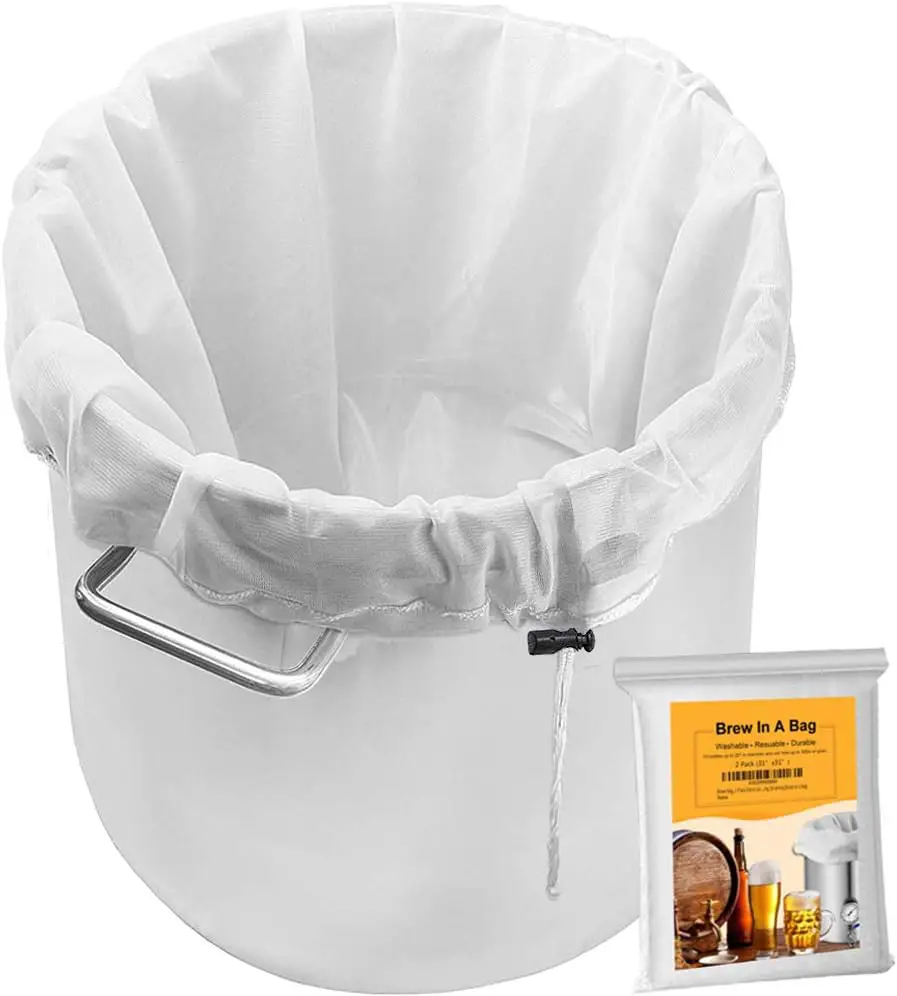
Brew bags can be made from fabric muslin or nylon and they’re pretty much all interchangeable. I use a standard mesh bag found at most home brewing stores – it’s cheap and it’s been a workhorse for me for dozens of brews. Just make sure that you get one that fits your kettle the best. You might need to do some measuring, but there’s also some companies that make custom fit brew bags if your kettle is a little odd shaped.
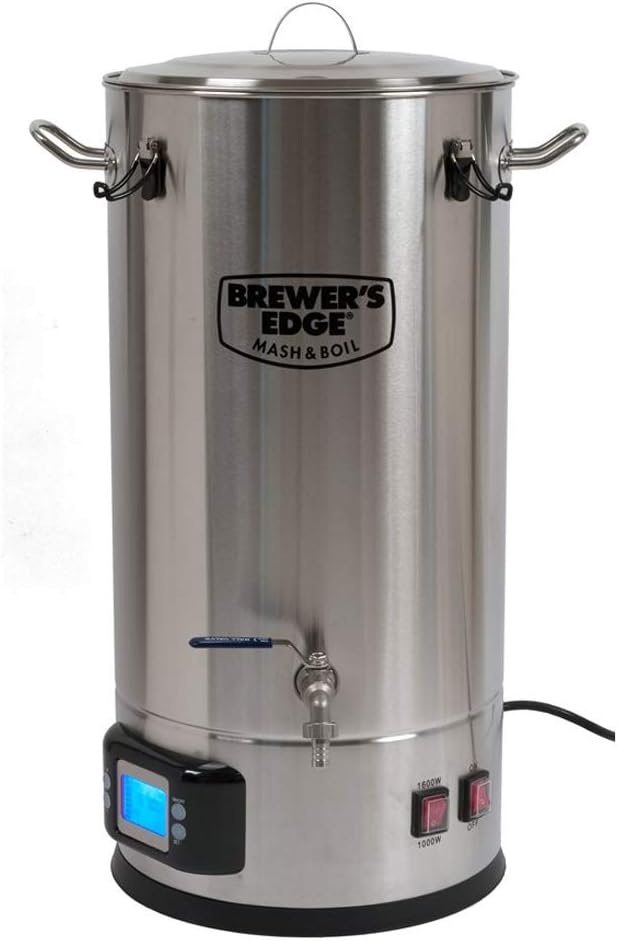
If you’re doing a 5 gallon or larger batch, you’re going to need a way to rapidly heat up all that water. A propane burner is the cheapest way to go – you can spend as much or as little as you want but they all do the same – make fire and heat up water.
If you’re going to do smaller batches, you might be able to get away with using your stove top. I did that for years when starting brew in a bag. I’ve even seen people make 5-gallon batches on stove tops, but just be careful not to make a mess or your significant other or roommate might evict you. You could also go electric for heating and there are a ton of kettle add-ons or electric brew in a bag system that work great. But unless you have access to 240-volt power your brew day is going to be a lot of waiting around for things to heat up.
I know an apartment brewer used a combo of electric and stove top to make amazing beers before jumping to a full electric burner bag system. Also, while we’re talking about heat – a good thermometer is useful to hit the right temp ranges for mashing or steeping the grains. But hopefully you already have one of these around the house.
A grain mill is also nice to have. As it’ll allow you to crush the grains to your preference. With brew in a bag, you can go as fine as you want since there’s no concern about a stuck mash or sparge like in traditional brewing systems. That means you can get a little more extraction out of the grains. But don’t worry if you don’t have a mill every home brew store has a mill that you can use. Or if you buy online, you can often buy your grains pre-crushed for a small fee – so don’t feel that you have to invest in that quite yet.
If your bag doesn’t have a drawstring in it, it might be useful to have some binder clips to keep your bag from falling in and a big spoon or paddle can help you stir in the grains so you can make sure everything gets well mixed. Some heat proof gloves might be helpful for lifting out the bag and if you want to upgrade, a pulley system makes pulling the bag out a breeze as it can get quite heavy.
On a budget? I find a cookie cooling rack to be a great way to hold the bag up and let it drain out, just make sure it’s a sturdy one.
That should be everything you need to get started brewing in a bag, now let’s talk about how to put it all together.
Ingredients
To make beer, start by collecting all your ingredients.
Let’s say you already have your recipe designed, grains picked out and crushed -set that aside for now. Next, we’ll need water – you can go many ways with types of water as well as some water additions you might want to add, let’s determine how much water you need.
A brewing software like Beer Smith or Brewer’s Friend is the ultimate resource to simplify this. You plug in your numbers and it’ll spit out how much you need to add. But the easiest way to think about it is to go back and consider your losses.
If your goal is five and a half gallons and you have a predicted one and a half gallons of losses, then add seven gallons of water, this might be over simplifying it considering that things like efficiency in your original gravity can sway this but it’s a good starting point.
If you don’t have the kettle space to add the amount of water needed, you can always add less water and make a more condensed wart and then add more water later to hit the right original gravity and volume.
So, with the water in the kettle, it’s time to heat it up for what’s called the mash.
Mashing
Mashing is when we steep the grains in hot water to convert the starches in the malts to fermentable sugars. It’s basically like making a big malt tea and the brew bag is your tea bag. The temperature range in which you mash can have many impacts on your beer. The temperature range you’re aiming for is anywhere from 145 to 158, the lower you mash the more fermentable sugars you’ll get, meaning a stronger but lighter body beer. The higher you mash the less fermentable sugars you’ll get, meaning a sweeter and fuller beer.
Once you’ve decided on what temp you want to mash at, you just need to heat your water up slightly above that number. Once you add the grains the temp will drop slightly so giving yourself a five-to-ten-degree buffer will help you land on your ideal mash temp – most brewing software account for this.
With your water to temp, turn off the heat and now it’s time to add the crushed grains.
First add in your brew bag then slowly add in your grains. You want to go slow so that you don’t get dough balls which is when grain clumps together and creates pockets of malt, that’s not getting saturated this will lower your extraction of sugars and you won’t get the most out of your grains. If you do get some dough balls just break them up with a spoon or a paddle. A benefit of brewing in the bag is that you’re using much more water to grain than in traditional brewing methods so you should have no problem mixing it up to make sure it’s fully saturated.
Once all the grains are in, set a timer for the mash anywhere from 20 to 60 minutes depending on how long you want to wait. The longer the more sugars you can potentially unlock – so I usually go for 45 minutes to be sure I get a strong wart.
If your temperature falls during the mash, don’t worry too much about that but if you want you can turn the burner on to raise it back up to your target mash temp.
Occasionally stirring is a good thing to keep the mash temp consistent throughout.
After the mash timer goes off you can now pull out the grains. As mentioned, a pulley sure would be nice as it gets pretty heavy, but I consider it my work out for the week and earn me some beers after that brew day.
But be careful as it’s hot and then just let the bag drain out in a bucket or on a cooling rack. I like the cooling rack on top of the kettle because it all just drips back in. You can also squeeze the bag to get more sweet wort out.
Don’t worry about that myth that says you’ll extract tannins – I’ve never had an issue with that and if you really want to get the most you can sparge.
Sparging is rinsing the brew bag with warm water to get more sugar.
It’s not required at all, but if you’re not able to add your full volume of water at the beginning, this is the perfect time to add it in as sparge water.
Once you’re satisfied with getting the water out of the bag you can dump those grains in a compost. If you brew a lot, you’ll have a lot of spent greens and you can make all kinds of snacks with them. Like dog treats pizza dough or breads.
Wort
Now you officially have your wart.
You just did all grain brewing in a bag – it’s really that simple. The wart is in the kettle ready to be boiled and have hops added just like you would on an extract kit. The rest of the brew day would go as you normally would.
Now let’s talk about some pros and cons of brewing in a bag.
Pros
For a new brewer one of the biggest pros, I think is the limited equipment you need. Really at the minimum all you need is a BIAB pot and a bag – you don’t need a ton of space to get started. It can even be done in a kitchen, garage or on a balcony. It makes for a simplified brew day which means a quicker brew day compared to traditional systems.
As well as an easy cleanup. Some of my brew days have been under three hours and it gets you into all grain faster. You’ll have greater control over your ingredients and flavors once you upgrade from extract.
Cons
Cons – the bag can be heavy to pick up when it’s saturated, so it might be a good idea to have a friend on hand to help you out.
Efficiency can be lower than traditional brewing methods, but in my opinion it’s not really that big a deal for me to add a little more grain to make up the difference. It can be hard to control exact mash temperatures in the kettle, but you could also mash in a cooler if you have pumps to move it around or invest in an electric brew in a bag system.
So why should you do brew in a bag?
In my opinion brewing a bag is just plain fun when you bring someone over that’s never brewed, they can jump in immediately without feeling overwhelmed.
There’s not a lot of extra parts and gear that can make it seem like you’re doing some crazy science experiment. Brewing strip down to its barest form and for the beginner, it’s the easiest and least expensive way to make the jump from extract. Which in the end will help you have more control over the ingredients and the quality of beer you make.
Brewing to me is all about having fun – and making something delicious.
And as long as brew in a bag can check both those boxes, I’ll keep doing it.
Someday I might upgrade to an electric brewing bag system, but for now I’m enjoying brewing outdoors and loving the beer I’m making. Check out these automated home brewing systems for apartments. Cheers!

0 Comments
6 Tips and Tricks for BIAB (Brew in a Bag) - Brew Fuse
[…] the legs off your grain basket, I haven’t done it yet but I’ve certainly thought about it. Check out more BIAB Brew in a Bag information here. […]
BIAB - 5 Brew in a Bag Upgrades - Brew Fuse
[…] Making upgrades to your system can make all the difference – whether that’s in the ease of the brewing day, the quality of the final beer or just the level of enjoyability you get out of brewing. The list today serves as optional but recommended upgrades – each one has their pros and cons, but they’re all intended to make your brewing life better. If you’re not familiar with brewing in a bag please go check out my other brew in a bag blog posts. […]